Webopac Preferences – Profile Options
1. Introduction
You can define options for each profile and for each language.
· Select the language for the profile from the drop-down menu
· Select the profile for which you want to make the changes

Languages are defined on the Start page.
This section (except “General”) is based on the information made available in the All Profiles section, different options will be made available in this section. The different sections available for customisation are:
· Defaults
· Databases (Bibliographic & Authority)
· Boolean Operators
· Restrictions (language, acquisition timeframes, locations, material types)
· Indexes
· Search Options
· Export options
· E-mail options
· SDI Profile setup
Note
Always remember to click the button to save any changes you have made.

When you change the wording of any of the texts, and save the changes, the following window is displayed:

· Select to apply the changes to one or more profiles
· Select if you do not want the changes to apply to another profile.
2. General
The first portion of the options available is the ability to associate StyleSheets with each profile. A different StyleSheet can be associated for Netscape and IE browsers:
![]()
The next section has information about some basic display options:

· Image (round corner) tab left/right:
- The file location of the image to be used on the tabs.
· Printer icon:
- The file location of the image to be used for the printer.
· Show printer icon:
- If set to Yes, the printer icon will show on the right above the record list display.

3. Defaults
Select the default language and the default search tab users of this profile will see when they first gain access to the system:

· Use the drop-down menus to select the user language and search method.
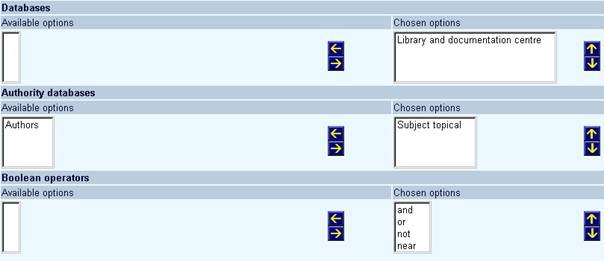
Select from this area which items to be made available for the current profile from the overall list:
·
Select an item from the list on the left-hand side of the screen and click the ![]() icon to move it to the accessible list on the right-hand side.
icon to move it to the accessible list on the right-hand side.
·
In order to change the order of the information, highlight an item in the right-hand side list and click the ![]() icon to move it up in the list or the
icon to move it up in the list or the ![]() icon to move it down in the list.
icon to move it down in the list.
·
To move an item out of the accessible options, highlight the item in the right-hand side list and click the ![]() icon. The item will move back into the left-hand side list and will not be displayed for the current profile.
icon. The item will move back into the left-hand side list and will not be displayed for the current profile.
4. Restrictions
Select what languages can be used to restrict a search. And select what time since acquisition will be made available for the user to select when restricting a search.
Note
The wording for the acquisitions restriction is defined in All Profiles – Options and texts.

·
Select an item from the list on the left-hand side of the screen and click the ![]() icon to move it to the accessible list on the right-hand side.
icon to move it to the accessible list on the right-hand side.
·
In order to change the order of the information, highlight an item in the right-hand side list and click the ![]() icon to move it up in the list or the
icon to move it up in the list or the ![]() icon to move it down in the list.
icon to move it down in the list.
·
To move an item out of the accessible options, highlight the item in the right-hand side list and click the ![]() icon. The item will move back into the left-hand side list and will not be displayed for the current profile.
icon. The item will move back into the left-hand side list and will not be displayed for the current profile.
5. Locations, Material types, Indexes
This section of the preferences screen allows the site to choose the available locations, material types and indexes that will be displayed in the current profile:

·
Select an item from the list on the left-hand side of the screen and click the ![]() icon to move it to the accessible list on the right-hand side.
icon to move it to the accessible list on the right-hand side.
·
In order to change the order of the information, highlight an item in the right-hand side list and click the ![]() icon to move it up in the list or the
icon to move it up in the list or the ![]() icon to move it down in the list.
icon to move it down in the list.
·
To move an item out of the accessible options, highlight the item in the right-hand side list and click the ![]() icon. The item will move back into the left-hand side list and will not be displayed for the current profile.
icon. The item will move back into the left-hand side list and will not be displayed for the current profile.
For the available indexes you can also specify whether or not these are available only for the current user interface.
Note
If you use sublocations (and a table is set up via AFO 613 – Sub-locations) you can set up restrictions for this in the same way as described above.
Other options
This section allows the site to define various defaults for the current profile:

· Choose the appropriate default index from the drop-down list.
· Specify whether or not authority items with zero records must be shown or not.
This parameter applies to the pop-up screen that is shown when you offer a search option on a field that is controlled by an authority list (e.g. Material Type). It determines whether or not the user will also see codes to which no bibliographic record is linked. Depending on the number of authority lists you have defined, you will see one or more indexes to set the parameter for.
Note
"Authority list indexes" are only applicable in a Smart format database, these options do not appear for any other type of database.
6. Weights
This section allows the site to specify what the weight of various searches will produce when finding related words.
The '' button appears on the full record display. It can be used to find titles that 'match to a certain extent' the title displayed. In this section you determine this matching, by letting certain elements weigh more than others or letting the number of occurences weigh more.

For example, in the above screen shot, the value is 3 for title words and the multiply factor 2. If, for the matching, 1 word in the title on screen occurs in another record, this record gets 3 points. ds match, the record will get 3 + 2x3 = 9 points. If the multiply factor was 1, it would only get 6 points. This allows you to assign more importance to multiple occurences. If you have both title and subject keywords as weight factors, you could for instance specify that multiple occurences of subject keywords are more important than multiple occurences of title keywords.
The option “Display related works button” can be checked to suppress or display the related works button for a database on a per profile basis
Note
Related works only works with the Smart database and does not work with MARC/21.
7. Other options
7.1 Miscellaneous options
The next section contains a few miscellaneous setup options.
![]()
Bibliographic records can be marked for Visible in WebOpac or not. There is a separate restriction index on WebOpac visibility. This flag works as a search restriction that is selectable in the staff module, but automatic in the WebOpac. In the WebOpac the use of the restriction is configurable by search profile. That way public profiles can skip records that are not meant to be visible, while staff profiles can still include those records in the search results.
If this option is set to Yes, it means you will see all records regardless of whether or not they are flagged as “invisible”

· Max. difference in position of two words to be NEAR:
- The NEAR Boolean term can be set to mean whatever the site deems reasonable per profile. In the above example, if two words are 1, 2 or 3 characters apart, they are to be considered NEAR.
· Mask sign stands for:
- The mask sign can stand for either 1 or 0 characters or 1 character.
· With Browse right truncate automatic, also in case of left or middle truncate:
- Right truncation is automatic when browsing – this will set both left and middle truncations automatic as well.
· What to show in case of no result:
- This allows either alternatives or an error message to be displayed if the word entered from a search results in no matches. Alternatives will only be displayed based on information and data in the actual database.
· One result: next level:
- If the search only finds one result, you can choose to display the full record immediately.
· Search on Internet:
- Allow the user to search on the internet from the full record based on their search criteria
· URL for searching the internet:
- If searching on the internet is allowed, input the string to place in front of the search term to automatically perform the search.
7.2 Data enrichment
The option Faceted Search makes it possible to restrict a search result on one or more criteria. To the right of the result list will display a table with the possible restrictions, when this option is activated. An example:

After clicking on e.g. “English” in the above example, The 366 English results are shown:
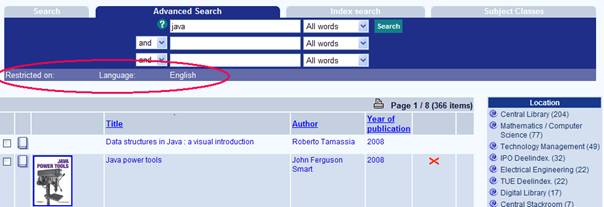
In case faceted search is used, the ‘normal' restriction options are not displayed anymore as you can see in the example above.
In case not all possibilities are shown, only the possibilities with the most results are shown and a link with a text like “More…”. After clicking that link, all results of all facets are shown. It is configurable how much options are shown.

The meaning of the options above:
·
The table width is the relative width as percentage of the total width of the left frame
·
If both faceted search and associations are shown, you can choose the order in which those options are displayed. Both options are displayed in the right table
·
The restriction options used for faceted search. If no option is selected, faceted search is not used
·
Optionally you can define authority indexes to be used for facet searching
·
The maximum number of items shown per index
·
The text shown if there are more results found than the maximum number to show.
·
The classes used for the header and the results. If no classes are defined here, the classes “listAlt” and “listAltHead” are used as default.
·
If faceted search is used by clicking on one of the restriction options, the chosen option(s) are shown on the tab. The wording of the label used here can be defined.
·
If the index for year of publication is chosen, it is possible to group the results. If no grouping is defined, all years are shown separate. If groupings are defined, only those groupings are shown. It is allowed to define overlap between the groupings. It is also allowed to define a grouping with an open begin or end.
In case of a serial publication that has issues in several years, then this publication returns under several years or grouping of years. E.g. a series that is published from 1965-1975 will be in the group 1960-1969 and in 1970-1979.
Some more remarks about configuration:
·
The icon shown in front of the results is called “facetbullet.gif” and must be stored in the “images/” directory.
·
In the header of the facets, the name of the restriction index is shown. If the restriction index is defined in “Options and texts” in Preferences, the wording given there is shown. If not, the wording as defined in AFO 151 is shown.
Note
In this section you also see the option "Show associations". This is related to separate Add-on functionality. Please contact Infor for more information.
7.3 Miscellaneous options start screen
The below options allow the site to configure some options particular to the start screen for the current profile:

· Choice of interface language:
- This allows for either flags, drop-down box or no language choice as well as the positioning of the flags.
· Choice of max. items per list:
- Users can have the option of choosing how many items to return in the brief display. Set whether this option is activated and what the default value is.
· Choice of profile:
- Even if a user is presented with a profile based on either the URL chosen or the IP address, it is possible to allow users to choose their own profile to use.
· Open Vubis Smart WebOpac in new browser window:
- Set whether or not Vubis Smart WebOpac will open in a new browser window when a user logs in.
Note
Mozilla based browsers (i.e. FireFox) may retain sensitive borrower information in its history after Logout from User Activities when the WebOpac profile is set as a non-public workstation and does not open a new browser window. It is highly recommended that all profiles which allow public access to workstations be set to force the logout from User Activities to reset the session. The last option above should be set to YES in order to clear personal information for any profile where shared access is required.
7.4 External search link
This option allows you to add a link for the execution of an external search as an easy way for the user to access an alternative search engine. This link can be added to the record list page and/or the full record display page.
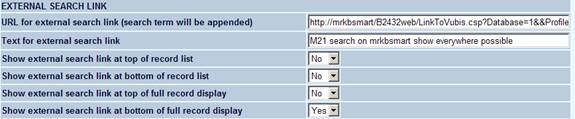
The display text and actual contents of the external link are defined here, as well as the places where the external link should be displayed (see Setup section). The link will open a new browser tab or window (so the current window contents are preserved).
8. Data export
If the user is allowed to export saved data this specifies where that data is exported to.
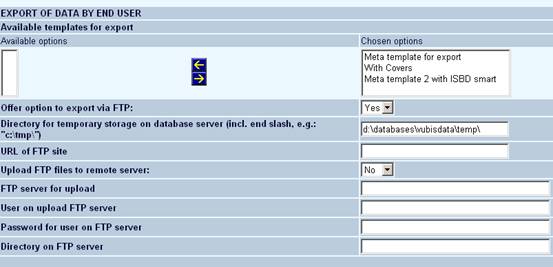
· Available templates for export
- Once you have created templates to be used for export, you can determine here whether or not they are available for this profile
· Offer option to export via FTP
- Specify whether or not FTP is allowed for export.
· Directory for temporary storage on database server:
- Where should files be kept temporarily for storage on the database server.
· URL of FTP site:
- What the URL of the ftp site is.
· Upload FTP files to remote server:
- Allow the user to ftp files
· FTP server for upload:
- The server information for uploading of files
· User on upload FTP server:
- User ID for FTP server
· Password for user on FTP server:
- Password for FTP server
· Directory on FTP server:
- What is the directory for the files on the FTP server
Additionally you can define various help and message texts:

9. Email
This section allows setup of email communication for marked records:

Fill in the text boxes as appropriate.
Note
Ensure both email addresses are valid.
10. SDI Profiles
Setup the management and configuration of the SDI profiles that can be created by borrowers:

· Maximum number of profiles per user
- This is the maximum number of SDI profiles each borrower is allowed.
· Maximum number of queries per user
- This is the maximum number of SDI queries allowed for each profile.
· Default number of publications before email notification
- This can be overridden by the user.
· Default number of days before email notification
- This can be overridden by the user.
· Default number of days for testing query
- This is the default period that appears for the test query option in the SDI configuration pages of the WebOpac. The borrower can select another period when testing their queries.
·
SDI results may be converted to a general savelist (**STAFF ONLY)
-
Check this box if staff are allowed to create a savelist based on SDI.
Note
The system can “convert” the data in an SDI result list to a “general savelist”. This will add the SDI results to a general savelist, which can then be used in a search tree. You can select from a list of existing general savelists, or create a new one. If you create a new savelist, you will need to give it a name in the box provided. If a name is not supplied, you will receive an error message and will be prompted to enter a name.
11. Bread crumb
With this option you can specify whether or not the search path must be shown at the top of the screen as well as the wording of the search path elements.

These settings would look like this on the display of a full bibliographic record:
Search -> Terms level 1 -> Terms level 2 -> Record list -> FullDescr